__________
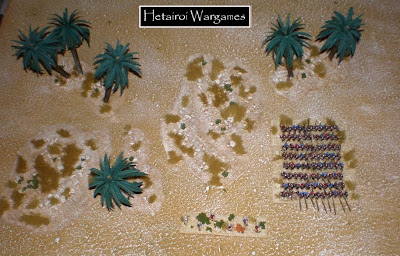
It has been a long time since the last time I made some scenery, although it´s one of the things I like most of this hobby. So in a couple of afternoons I´ve managed to do a few ones.
MATERIALES
Esta primera entrada relacionada con la escenografía (habrá más!) voy a dedicarla al desierto, de forma que podré utilizar estos elementos en mis batallas con los seléucidas de Impetus o incluso en Ambush Alley.
Los materiales que he utilizado son:
- Trozos de DM para la base.
- Masilla blanca (aguaplas) y cola blanca.
- Arena fina, piedritas y cortezas de pino.
- Palmeras (de los chinos para el belén o de modelismo).
- Césped, flocado, etc.
__________
This first entry relating scenery (there will be more!) will be dedicated to desert, so I could use it in my battles with my Impetus Seleucids or even in Ambush Alley.
The materials I used were:
- Pieces of MDF for the base.
- White putty and PVA glue.
- Sand, gravel and pine bark.
- Palm trees (from bazars or modelism).
- Grass, flock, etc..
PASO 1

El primer paso es crear las bases cortando los trozos de DM con una forma irregular, afilando los bordes de la madera para que hagan una ligera pendiente desde la mesa.
__________
The first step is create the bases, cutting the pieces of MDF with an irregular shape and sharpening the edges of the wood to make a slight slope from the table.
PASO 2

En este paso colocamos las palmeras, puede que sea necesario hacer un pequeño hueco en el DM para que la sujeción sea más fuerte.
__________
In this step we place the palms, you may need to make a small hole in the DMF in order to get a stronger subject.
PASO 3

Para dar algo más de relieve añadimos algo de masilla blanca (aquaplast, por ejemplo).
__________
To give more volume, we can add some white putty.
PASO 4

Para añadir la arena cubrimos la base con una capa de cola blanca. Primero colocamos algunas piedrecitas más grandes (yo usé arena para gatos) y algunos trozos de corteza, luego lo cubrimos todo con la arena fina (arena de playa, en mi caso). Tras dejar reposar unos minutos para que la arena se adhiera bien, sacudimos un poco la base para eliminar la que no se ha pegado del todo.
Dejamos secar unos minutos más y le damos otra capa de cola blanca muy diluida, que hará que se peguen los granos de arena que puedan quedar sueltos.
__________
To add the sand, cover the base with a layer of PVA glue. First, place some larger stones (I used cat litter) and some pieces of bark, then cover everything with fine sand (beach sand, in my case). After waiting a few minutes to let the sand sticks well, shake the base a bit to eliminate the sand that has not been glued at all.
Let it dry a few more minutes and give another layer of very diluted PVA glue that will stick the grains of sand that may get loose.
PASO 5

Para pintar he escogido los siguientes colores de Vallejo: Marrón ocre de base, un pincel seco de Arena oscula como segunda capa y para terminar, en algunos puntos, otro pincel seco de Blanco hueso.
Los últimos retoques son añadir algo de césped, arbustos, etc. También le he dado un lavado de tinta al tronco de la palmera para oscurecerlo un poco más.
__________
To paint I chose the following Vallejo colors: Ocher brown for the base, a dry brush of Dark sand as a second layer and finally, at some points, another dry brush with Ivory.
For the finishing touches, add some grass, bushes, flock, etc.. I have also give an ink wash to the trunk of the palm, giving it a little more obscure tone.
RESULTADO FINAL
Y este es el resultado final, junto a algunas de mis unidades de Impetus:
__________
And this is the final result, along with some of my Impetus units:


A lo mejor un poco grandes para 10mm y demasiado pequeños para 20mm (siempre quejándome...) pero creo que han quedado muy aparentes.
Esta tarde termino los ashigaru y empiezo con las peanas. También tengo que terminar un oasis, así que el los próximos días actualizaré con más frecuencia.
__________
Maybe a little too big for 10mm and too small for 20mm (always complaining ...) but I think they are very apparent.
This afternoon I´ll finish the ashigaru, and get on with the bases. I also have to complete an oasis, so the coming days I will be updating more often.
Nos vemos!
Very useful guide. As for being too large for 10mm and too small for 20mm I think they look fine (although maybe a comparison shot beside some 20mm?). Also anything which reduces the amount of terrain you have is good with me
ResponderEliminar