5 feb 2014

Roman cavalry

Unidad de caballería romana. Estas figuras de Pendraken son absolutamente geniales, ha sido una gozada pintarlas, tienen el detalle perfecto.
-------------------------------------
Roman cavalry unit. These Pendraken figures are absolutely great, it has been a joy to paint them, they have the perfect detail.


Pintaré otra unidad (debería haberlo hecho a la vez) para cubrir el otro ala.
--------------------------------------------
I´ll paint another unit (should have done all of them at once) to cover the other wing.


Nos vemos!

4 feb 2014

X-Wing AAR!

Algunas fotos de la última partida de X-Wing. El imperio logró destruir un Ala-X y un Ala-Y, pero perdió también dos TIE y el TIE Avanzado. Cuando sólo quedaban la lanzadera Lambda y un Ala-X decidimos dejar la partida (tenemos que empezar a jugar con objetivos...).
------------------------------------
Some photos of the last X-Wing game. The empire managed to destroy an X-wing and a Y-wing, but also lost two TIE and the TIE Advanced. Whith only the Lambda shuttle and an X-wing, we decided to end the game (we need to start playing with objetives...).


Me ha gustado la lanzadera Lambda, aunque por sí sola no puede hacer mucho con su escasa maniobrabilidad, apoyando y absorbiendo fuego puede dar algún quebradero de cabeza al adversario.
------------------------------------
I liked the Lambda shuttle, although alone it can not do much with it´s limited maneuverability, supporting and absorbing enemy fire can give quite a headache to the adversary.


Nos vemos!

3 feb 2014

Tread softly!


La pasarela de madera se puede quitar. ------ The wooden walkway can be removed.


 Aspecto de la mazmorra, por ahora. ------------- Look of the dungeon, by now.


Nos vemos!

31 ene 2014

Pendraken Painting Competition 2014


Calentando los pinceles para una nueva edición del concurso de pintura de Pendraken. Os dejo algunos avances de lo que he pintado esta semana.
-----------------------------------------------------------
Warming up the brushes for the new edition of  Pendraken Painting Competition. Here you have some teasers of what I have painted this week.


Nos vemos!

22 ene 2014

Dungeon section - Step by step


The basic materials used in this tutorial are:
  • Foamboard of different thicknesses
  • MDF
  • PVA
  • Putty

The first step consist on designing the sections, preferably using a complex design program... like Paint. My first sections will be:

An intersection or junction of corridors.
  

A long corridor and two interconnected rooms.


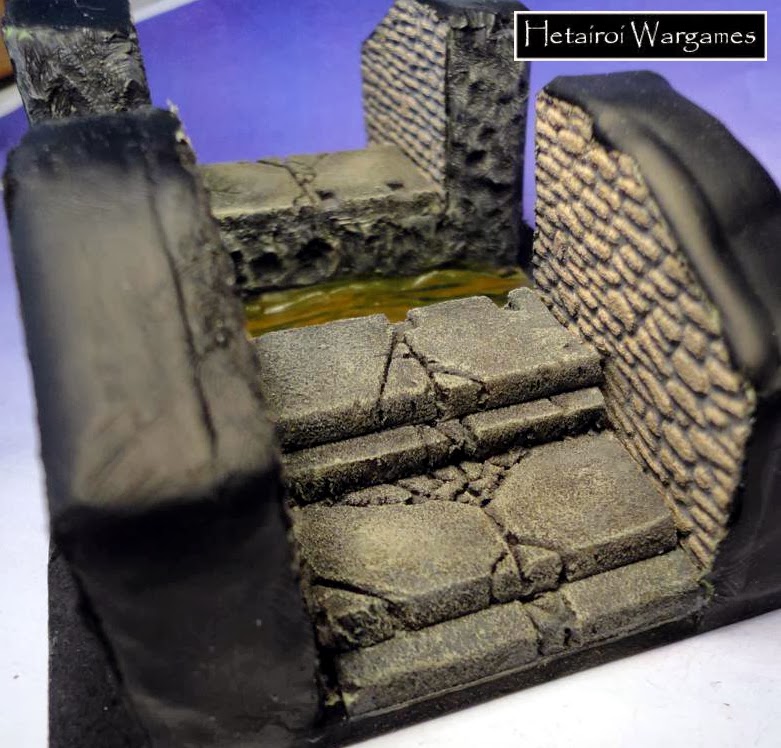
Lets start working. Chose the standard size for your tiles and cut the the areas for the room floors or corridors on the foamboard. On each "floor", remove one of the cardboard sides of the foamboard, leaving the foam on air on that side, and mark the tiles on it with a pen. What I did was draw a large grid on the plate of foamboard and then cut out the pieces (the corridor looks more irregular because it's made of leftover pieces). Once we have it ready, stick it on the MDF base. Notice that the corridor´s end extends to the edge of the base, so it will match the beginning of the next section.


Mark the separation between tiles using a thin object (a rule or a little sharp knife). I used a modeling knife to make the detailed cracks and broken tiles.


 Once finished, give a coat (better two) of very diluted PVA to harden the foam.


To make the walls I also used the foamboard (of different thicknesses) and cut strips with a predetermined heigh (the height of our dungeon ). Stick the strips to the MDF base with PVA and fill any gap with more foamboard.


You can remove the cardboard side of the foamboard and draw stone reliefs on the wall (as with tiles), but as it would be too much work for me, I decided to use a stone effect sheet on the corridor walls, and thus give some uniformity to the dungeon. The remaining walls is just the foamboard .


Finally we can use some putty to cover the top of the walls, where the cutting of the foamboard can be seen. Iuse a mixture of clay and plumber putty.


Time to add the doors, but I leave that for another tutorial... So there is only paint left, but before doing so it is a good idea to give a coat of diluted PVA to the walls. I used the following technique, similar to that used with rocks:
  1. Paint the base color. For example, Basalt gray in the corridor.
  2. Make two washes with very dilute black and brown paint.
  3. Dry brush  the base color.
  4. Another dry brush with a lighter collor (Stone gray).
  5. Paint the "not visible zones" in black.

I hope you enjoy it and I encourage you to make your own dungeons, boards or whatever!

Nos vemos!

Sección de mazmorra - Paso a paso


Los materiales básicos utilizados en este tutorial son:
  • Cartón pluma de diferentes grosores
  • Tablero DM
  • Cola blanca
  • Masilla
Lo primero es diseñar las secciones, preferiblemente utilizando algún complejo programa de diseño... como el Paint. Mis primeras secciones van a ser:

Una intersección, o cruce de pasillos


Un pasillo largo y dos habitaciones interconectadas.


Nos ponemos manos a la obra. Elegimos el tamaño estándar para nuestras baldosas y recortamos en el cartón pluma las superficies correspondientes al suelo de cada habitación/pasillo. A cada "suelo" le quitamos una de las caras de cartón del cartón pluma, dejando la espuma al aire en ese lado, y marcamos las baldosas con un bolígrafo. Yo lo que hice fue dibujar una rejilla grande sobre la plancha de cartón pluma y después recorté los trozos (el pasillo se vé más irregular porque está hecho con trozos que me sobraron al recortar). Una vez lo tenemos listo lo pegamos sobre la base de DM. Fijaros que los extremos del pasillo llegan hasta el borde, para coincidir con la entrada de la siguiente sección. 


Marcamos bien la separación entre baldosas, usando un objeto fino (una regla o un cuchillo poco afilado). Para hacer el detalle de las grietas y baldosas rotas usamos una cuchilla de modelismo.


Una vez terminado damos una capa (mejor dos) de cola blanca diluida para endurecer la espuma.


Para hacer las paredes utilizamos también el cartón pluma (de diferentes grosores) y cortamos tiras con una anchura predeterminada (la altura de nuestra mazmorra). Pegamos las tiras con cola blanca a la base de DM y vamos rellenando huecos con más cartón pluma.


Se puede quital la lámina de cartón del cartón pluma para dibujar relieves de piedra en la pared (como con las baldosas), pero como sería mucho trabajo, dicidí utilizar una lámina con efecto piedra para las paredes de los pasillos y así dar algo de uniformidad a la mazmorra. El resto de paredes es simplemente el cartón pluma.


Para terminar podemos utilizar algo de masilla para cubrir la parte superior de las paredes, donde se aprecia el corte del cartón pluma.Yo utilizo una mezcla de masilla de fontanero con plastilina.


Ya sólo queda añadir las puertas, que explicaré en otro tutorial cómo las hago, y pintarlo. Para pintarlo he seguido el siguiente método:
  1. Elijo un color, por ejemplo gris basalto para el suelo del pasillo.
  2. Hago dos lavados con pintura muy diluida (mucho), negro y marrón.
  3. Cuando se seque hago pincel seco con el color base (gris basalto).
  4. Hago otro pincel seco con un tono más claro, por ejemplo gris piedra.
  5. Las zonas "no visibles" las pinto en color negro.

Espero que os haya gustado y que os anime a hacer vuestras propias creaciones!

Nos vemos!

17 ene 2014

HeroQuest dice

He usado unos dados de Blank dice para hacerme mis dados de HeroQuest. Aunque son un poco más grandes de lo que esperaba estoy muy contento con el resultado. Además, en la propia página web tienen una plantilla para que puedas imprimir las pegatinas, así que ha sido todo muy sencillo.

Leí en el foro de La Armada que si se le aplica un poco de cera a la pegatina resiste mucho más. Tendré que probarlo...


I´ve used I´ve used Blank dice dice for my HeroQuest dice. Although they are a little bigger than I expected I'm very happy with the result. In addition, the website itself have a template so you can print the stickers, so it was all very simple.

I read in La Armada forum that if you apply some wax to the sticker it resists much more. I'll have to try it...


Nos vemos!